CASCAD-e Quick Start Guide
This Quick Start Guide is intended only as its name indicates, a quick start. It will only cover the very basics of the capabilities of the CASCAD-e program. If the user will take a quick tour of CASCAD-e by using this quick start guide, one will find how easy CASCAD-e can be to use. However, CASCAD-e is also a very flexible and powerful graphical data base program that requires the further explanations that are provided in the User’s Guide. For a more detailed discussion of any area, please refer to the CASCAD-e User’s Guide. This guide assumes that the user has loaded the software onto their computer.
- Launch the program by a double left click (DLC) on the CASCAD-e icon.
- Select “Create New Project.”
![]()
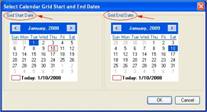
3. Set up the calendar parameters within which you will be building your project schedule. Allow extra space by starting about two months before the project start and about six months past the expected project end date. Click “OK” and a calendar grid will appear.
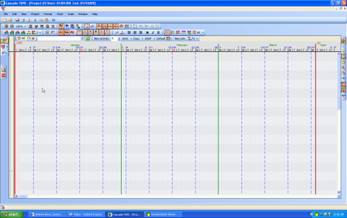
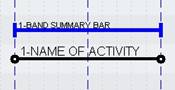
4. Create a band by right clicking (RC) on a row near the top inside the display area. See the User’s Guide for a discussion on the use of bands.
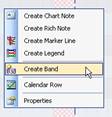
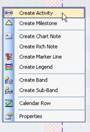
5. Once you have a band created (it will not display until an activity is added) you can begin to add activities on any row under that band. Place your cursor on the date where you want your activity to begin and (RC). Select “create activity” and it will be created with the default duration and a “Band Summary Bar” will appear (see User’s Guide for further discussion).
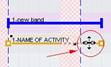
5. You can add a name to your activity with two methods. First, you can just double click in the text box of the activity. Second, and the easiest way for multiple activities, is to make sure the “quick edit button” is turned on. Then all you have to do is simply to start typing when an activity is selected.
The Quick Edit Button – ![]()
(See the User’s Guide on
selecting the shape, color, font, and other characteristics of activities.)
6. Edit the duration of an activity by selecting the activity and placing the cursor over one of the ends of the activity. Adjust the duration by holding a (LC) on your mouse and dragging left or right. (See the User’s Guide at the end of the “GETTING STARTED” section to become familiar with the various cursor symbols that you will encounter.

7. To move an activity, select the activity and place the cursor on the activity. The appearance of the cursor will change if you have “day lock” or “row lock” turned on (see User’s Guide) which restricts the move to either a horizontal or vertical move. Once your cursor is on the activity, simply hold a (LC) and drag to the new position- horizontally, vertically, or diagonally.
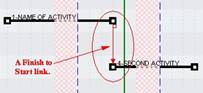
8. Once you have created more than one activity, you can link activities together with “Predecessor” and “Successor” constraints referred to as “links.” Select an activity by a (LC) and then (RC) to get the pop-up menu.

Select either the “predecessor” or “successor” link. Now select the activity with which you want to create the link by a (LC) on the activity.
You should now have something similar to this:
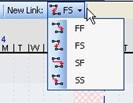
To change the default setting for the links use this tool bar:
To edit a link select it with a (LC) and then make a (RC) to get the pop-up menu:

For further discussions
on links and editing their lag factors please refer to the User’s Guide.
9. You can maintain or remove the integrity of these links (and clear impacted activities) with the following tool bar buttons:
![]()
For a more detailed
discussion of integrity moves and impacted activities, please refer to the
User’s Guide.
10. The critical path can be viewed by utilizing the buttons on the following tool bar:
![]()
The use of the “early
start” and “late start” buttons should be reviewed in the User’s Guide.
11. Printing your schedule. This is best understood in the User’s Guide, but a quick review is to utilize the following tool bar:

Select the button “create print zone” and then drag a rectangle from top left to bottom right to create the zone or zones. A double (LC) inside the zone will cause the Print Pop-up menu display. Set your parameters for the zone(s) within that window. Now select the button at the bottom right titled “print preview.” Another window will pop-up showing how the print zone will look once printed. If it is acceptable, then (LC) on the printer icon at the upper right corner of the print preview window to send it to the printer you selected.
Please refer to the
CASCAD-e User’s Guide for more detailed discussions of the above points of
interest as well as further capabilities of CASCAD-e Project Schedule software
such as zoom, fence selection, copying, adding rows, suppressing numbers,
creating classifications, properties, notes, marker lines, milestones,
collapsing to a summary schedule (or expanding from), etc.